I really must work on my titles, but this one will have to do for now.
However, I digress before I even begin. And before I begin for a second time, I will warn that this is a rather lengthy post.
This post is the first in a series created especially for the art of creating images using Microsoft PowerPoint. I will overuse the words ‘create’, ‘creative’, ‘creating’ and ‘creativity’, for this post is intended to both emphasise and promote the creative process. Being creative is an excellent way to pass the time, Feel Good, and generate new ideas. Besides, it’s fun!
So, today, we shall be creating a lantern.
I use PowerPoint2007 and I know there are later versions available which look slightly different and have different functions, but part of the creative process is finding and using the functions and processes that fit in and work well with whatever it is we are creating. The same can really be said with life itself. If we don’t like something, we don’t use it. If we love it, we use it constantly. Like the word ‘creative’. Hehehe!
So. On with the lantern. I’ve broken down my process into each step, and have taken screenshots along the way which work a lot better than just reading words.
We start with a basic shape. I selected a circle, and then with the mouse stretched it out to create a more oval shape.

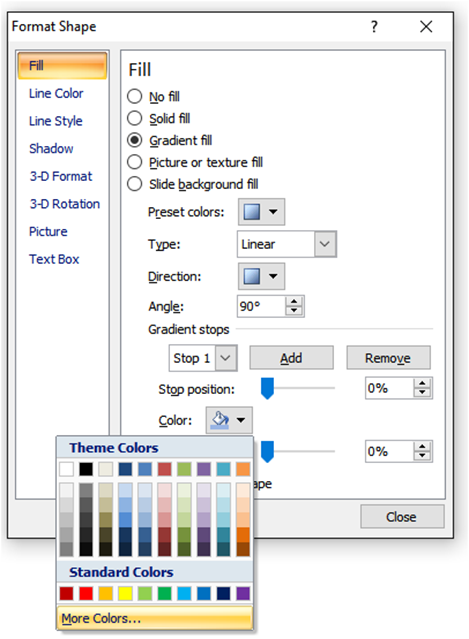
I now need to adapt the shape and alter its colour.
Right-clicking on the shape displays a menu, and I need to use ‘Format Shape’.
Selecting this brings in further options. Here, I need to select ‘Gradient fill’. The various stops for the gradient, or where the colours or shades change, appear at the bottom of the new sub-menu that appears.

I select each stop in turn, and then choose the colour for that particular part of the fill. There is an option for More Colours, so the choice isn’t limited to those colours displayed.
Once I’ve selected the colours, I then need to adjust the 3D formatting, especially if I want to give my completed image a 3D feel! There are two options to be used, 3-D Format and 3-D Rotation.
In 3-D Format, I use the Bevel feature. This is used if spheres are needed to be created, from a basic circle, but it also adds depth to any shape. I adjust the Width and Height sizes in both the Top and Bottom section by using the arrows. Numbers can be entered manually as well, and the effects received can be quite effective just by doing that.

Next, I need to rotate the image slightly, so that it creates further perspective. Again, altering the figures rotates the shape this way and that.

Back in the 3-D Format option again, I need to adjust the depth…

and the surface material…

and the lighting…

Once I’m happy with all of the formatting, I then need to create further shapes. Copying and pasting works a treat here, especially if similar shapes are needed. I then simply resize each shape to the required size. I may need to adjust the 3D formatting again on some shapes, as the size of the shape can have an effect on the look of it

The next stage is to add the main body of the lantern, so I create another oval shape, and fill it with a solid colour this time.

Once again, I tweak the shape as I did earlier, but this time I select a Translucent option. I then group them together once I’m happy with the formatting

The new oval needs to appear beneath what is now the top of the lantern, so I simply send the shape to the back


Already it is starting to take shape.
Now I need to add the base, and once again I simply copy and paste the shapes, and tweak them once more…

Now, the lantern needs a handle. To create this, simply select a Moon shape

Jiggery poke it a bit by resizing and rotating

And move it on top of the image that is taking shape nicely. It may need resizing slightly again to better fit the lantern

Now for a little detail. Add hinges for the handle by selecting the shape known as the Donut

Resize, fill and position over one end of the handle. Copy and paste it and add this second ring over the other end of the handle… sending this ring to the back.
Then, bring in a candle to light the lantern

Position the candle over the lantern, and resize it as necessary. Then, send the candle to the back, so it gives the impression of being within the ‘glass’.
Now, select all objects and group them together

And Save as a picture

Now all that is left to do is to create a background for the lantern. I’ve just chosen a simple grey square for this picture, and filled it as I did the other shapes. I brought in my lantern, added a little shadow, and added my signature that I use for most of these PowerPoint creations, and there we have it. A lantern is created.

If I’m creating a scene with various objects, I create each object individually and save each one as a separate picture, and bring them all together at the end… obviously, if I were to be using two lanterns, I’d simply use the copy and paste option. It comes in very handy at times, that little tool does!
I hope this rather lengthy post, if you’ve managed to stay awake until the end of it, has inspired you to have a go at creating something in PowerPoint.
It is fiddly, and it can be frustrating at times, but it is fun… and as I’ve already mentioned that is what the creative process is all about!

That is sooo good, Tom! It’s filled in a lot of the blanks for me – I’m going to play this weekend, says she, skipping away 🙂
LikeLiked by 1 person
Hope you have fun doing so, Raili. It’s tricky to begin with, but it gets easier.
LikeLiked by 1 person
You’re such an artist with PowerPoint, Tom! Fun to see your process. 🙂
LikeLiked by 1 person
Thanks, Diane. I tend to rush my creations, but I have fun doing them just the same. I had to slow myself down to create this post, however!
LikeLiked by 1 person
Mommy is it over yet??? 😉
You are a smart dude Tom, so may your light shine brightly!!! 🙂
God Bless!
Prenin.
LikeLiked by 1 person
Eek! Yes, it is more technical journal than quick user guide, Prenin, I agree. It’s all finished now. Well, this part is!
And thank you.
LikeLiked by 1 person
WOW Tom.. Now although I have played in PP.. I never knew it did all of that.. So I will be clicking and having another play around one wet afternoon.. 🙂
Brilliant.. Thank you
LikeLiked by 1 person
Thanks, Sue.
It is tricky, but good when you see the creation taking shape. Just like painting, really!
LikeLiked by 1 person
And less messy. 🙂
LikeLiked by 1 person
Oh yes, of course!!! ;D
Sorry for the late reply, Sue.
LikeLiked by 1 person